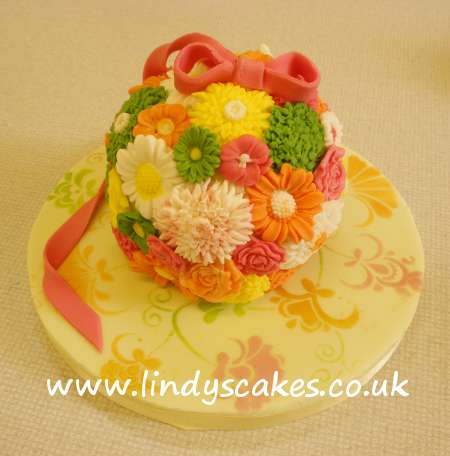
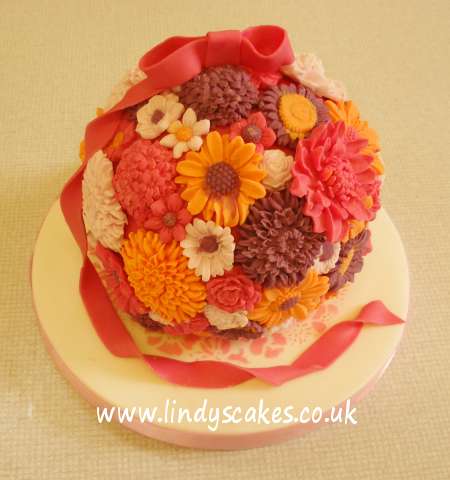
Inspired by the beautiful fresh flower ‘Victorian Kissing Balls’, Lindy has given this ball of flowers the Lindy Smith treatment bringing it bang up to date with her own version. Lindy’s Pretty Flower Posy is vintage inspired but also ultra- modern.
Eight students arrived today armed with an arsenal of sugarcraft paraphernalia ready to mould balls and create masses of flowers. There are a lot of familiar faces today with 5 of the 8 ladies being repeat students and as an extra special treat our very own Jane has swapped her work apron for a student apron to join the class. But it’s ok because we have Sally on hand as our expert assistant… and when there’ a Sally… there’s a Lemon Drizzle cake. Yum yum…
Wasting no time Lindy gets stuck into the covering of the board. For this group it’s a breeze and as I type I am sitting amongst 8 sugarpaste adorned cake boards in various colours each stencilled making them instantly recognisable and unique. We even have an tartan ribbon wrapped around the edge of one board… a nice twist!

You wouldn’t think it possible but it is… yes you can cover a ball shape with sugarpaste. Using the ball tin to bake your cake in is a good start for the perfect round shape. Lindy always says that getting the basics right will always serve you well in cake decorating. Incredibly malleable, sugarpaste can be smoothed and moulded around the ball cake relatively easily. Gravity defying and super impressive, the ball cake never fails to impress… even at this early stage… pre decoration!
Moulds, moulds, moulds…. Lindy’s Cakes now sells an impressive number of moulds, with 18 new moulds joining the range last week. It is no secret that Lindy loves moulds and you will see them being used frequently in her work. In her latest book ‘The Contemporary Cake Decorating Bible’ there are many examples! They are ridiculously easy to use and produce impressive crisp shapes really fast. Today our focus is on flowers for the posy but Lindy being Lindy has to be different and has decided to add buttons to her posy cake. As I type Lindy is covering her cake with layers of buttons as well as the flowers, the buttons are coming out all textured like fabric… stunning!
The posies are starting to take shape now as our ladies start placing the flowers on the balls and it’s a joy to see. The colour combinations are super. Some are doing a 3 way colour scheme, some a 4 way and others have gone wild with a blaze of colour.

Nicola has been telling me about how she has turned her love of sugarcrafting into a business. Based on the Isle of Man she has travelled the furthest to be with us today. It’s always great to hear about people turning their hobby into a business. Lindy can really relate to that and look at her now! Nicola has come with her Aunt Rosie today, we know Rosie from previous classes. Rosie is more used to decorating cupcakes and cookies and prefers decorating on smaller scale, but we agreed that she cold pop the moulded flowers on top of cupcakes and cookies. Proving once again that the skills learnt at a Lindy Smith workshop are useful and can be applied to many aspects of sugarcraft.
Oh I have just spied Jane popping a sneaky surprise on to her posy. Can you see what it is?

Judy’s cream roses, which sit amongst her purple and green flowers, look so good they could be mistaken for white chocolate roses… now there’s an idea!!
Alison who is in the middle of a NVQ Level 1 course in Cake Decorating is adding another feather to her bow and enhancing her sugarcraft knowledge today with Lindy. Her posy is an explosion of colour. Lindy loves colour! We’re in stitches because Alison is making some rather interesting noises as she tries to extract her flower from a mould… it’s proving a little stubborn! Judy said ‘this is a bit of a ‘When Harry Met Sally Moment’ you know… the scene in the diner!! Oh how we laughed.

The final touch to this cake is the ribbon. Lindy is currently demonstrating the making of the ribbon, using the ‘ribbon cutter’. She is now making a bow and attaching it to the cake… ooooo she makes it look so easy.
This is the kind of class where you feel like there is a lot of preparation then all of a sudden it all comes together. It’s true that you do spend some time making the flowers and laying them on the table as you work waiting for the next step… but when you come to attach them to the cake all of a sudden, in a relatively short space of time, this beautiful posy emerges. Voila a ball no more!

What a super class it has been today. The ladies have been fantastic and as this day draws to an end I see before me a florist shop of blooms! This workshop has been popular ever since Lindy started it. The Pretty Flower Posy is a show stopper and the kind of cake that mesmerises you. How do you create a ball, how do you make those flowers, how do you get the detail ? !! The answer lies with Lindy and her wonderful workshops!! Join us one day… you know you want to 🙂
To visit the class pages of our website please click here
Caroline Halliday says
Hello!
I have a couple of questions about covering ball cakes I hope you can help with. (I am planning to make a 4inch golf ball cake- I’ve never attempted a round one before). Do you need to cut a flat bit on the bottom of the cake to stop it rolling around? Also, how do you finish the sugarpaste at the bottom? Do you press with a smoother and cut off the excess (similar to a round or square cake) or do you lift up the cake and tuck it all underneath like you are tucking in a blanket? And I wondered as well whether the assembled (madeira) cake can be frozen with a layer of buttercream in the middle (is it safe to freeze buttercream?). Many thanks. I only wish I lived close enough to come to a class.
Regards
Caroline
Lindy's team says
Hi Caroline
Thanks for your ball cake questions – You don’t need to cut a flat bit at the bottom as the weight of the cake will enable it to sit correctly. When covering, cut the sugarpaste into a circle the same diameter as the circumference of your cake. Ease the paste over the ball cake and pull up excess to make pleats. Cut the excess away and smooth the joins closed. Trim any excess away from the base, do not tuck it under. Use a smoother followed by your hand.
Lindy’s Contemporary Cake Bible has a small section about covering ball cakes. It is full of tips and step-by-step photos to make it easier to understand. If you can’t get to any classes perhaps you might find this book useful.
Lindy says you can freeze cakes with buttercream in. Good luck with your cake, I hope it is a great success.
Susie
Kim says
How far ahead can you make the flowers to go on the posy cake, are they better still soft so they can follow the shape of the sphere? I am making a posy cake to go on the top of my daughter’s wedding cake ( she loves the one in your book) and any tips would be much appreciated.
Thanks
Kim
Lindys Team says
Hi Kim
Ideally you would use your flowers while they are still soft, i.e. the same day. If it is not possible then use foil or high quality greaseproof paper to wrap the flowers in. As it is a posy-shaped cake you will need them to bend slightly to fit the shape of the cake.
Lindy sometimes puts her sugarpaste in the microwave for a very, very short time to soften up before shaping, if it has been left too long. It would obviously be trial and error and one flower at a time, if you were to try to re-soften the sugarpaste. I am not sure if Lindy has used this method on shapes already cut, so please be very careful. It may not work at all with the flower shapes, but you could always experiment with a couple of flowers first and see how it turns out.
Good luck.
Kind regards
Lindy’s Team